728x90

🔥Next.js Layout과 Firebase로 AuthGuard 구현하기(feat. cookie)
Next.js App Router에서 Layout을 활용해 메인페이지 하위에 공통 레이아웃을 적용해 AuthGuard를 적용해보자.
메인페이지 하위 폴더 내에는 무조건 로그인을 해야 접속할 수 있게!!
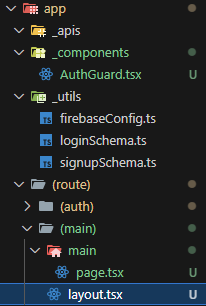
0. 폴더구조

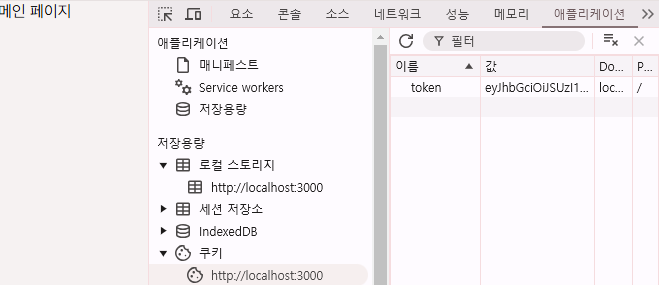
1. 로그인 시 토큰 저장
로그인 시 Firebase에서 발급된 JWT 토큰을 쿠키에 저장해 인증 상태를 유지한다.
npm install cookies-nextconst onSubmit = async (data: FormData) => {
try {
const userCredential = await signInWithEmailAndPassword(
auth,
data.email,
data.password,
)
const token = await userCredential.user.getIdToken()
setCookie('token', token, {
maxAge: 60 * 60 * 24,
secure: true,
path: '/',
})
alert('로그인 성공!')
router.push('/main')
} catch (error) {
console.error(error)
if (error instanceof FirebaseError) {
switch (error.code) {
case 'auth/user-not-found':
alert('사용자가 없습니다. 회원가입을 진행해 주세요.')
router.push('/signup')
break
case 'auth/wrong-password':
alert('비밀번호가 틀렸습니다.')
break
default:
alert('알 수 없는 오류가 발생했습니다. 다시 시도해주세요.')
}
} else {
alert('알 수 없는 오류가 발생했습니다. 다시 시도해주세요.')
}
}
}2. AuthGuard 컴포넌트 구현
- AuthGuard는 로그인 여부를 확인해 미인증 사용자를 리다이렉트한다.
- 인증된 경우에만 자식 컴포넌트를 렌더링한다.
  'use client'
import { auth } from '@/app/_utils/firebaseConfig'
import { getCookie } from 'cookies-next'
import { onAuthStateChanged } from 'firebase/auth'
import { useRouter } from 'next/navigation'
import { ReactNode, useEffect, useState } from 'react'

interface AuthGuardProps {
  children: ReactNode
}

export default function AuthGuard({ children }: AuthGuardProps) {
  const [isLogin, setIsLogin] = useState(false)
  const router = useRouter()

  useEffect(() => {
    const token = getCookie('token')

    if (token) {
      onAuthStateChanged(auth, (user) => {
        if (user) {
          setIsLogin(true)
        } else {
          alert('로그인이 필요합니다.')
          router.push('/login')
        }
      })
    } else {
      alert('로그인이 필요합니다.')
      router.push('/login')
    }
  }, [router])

  if (!isLogin) {
    return <div>로딩 중...</div>
  }

  return <div>{children}</div>
}
❓onAuthStateChanged
onAuthStateChanged는 Firebase Authentication에서 제공하는 상태 변화 리스너다.
이 메서드는 사용자의 로그인 상태가 변경될 때마다 호출되어, 사용자가 로그인했는지 또는 로그아웃했는지 여부를 알 수 있다. (주로 로그인, 로그아웃, 세션 유지 등의 상태를 관리하는 데 사용된다!)
Firebase에서 사용자 인증 상태가 변경되면 즉시 이를 반영할 수 있어 실시간으로 사용자 인증 상태를 관리할 수 있다.
https://firebase.google.com/docs/auth/web/manage-users?hl=ko
Firebase에서 사용자 관리하기
의견 보내기 Firebase에서 사용자 관리하기 컬렉션을 사용해 정리하기 내 환경설정을 기준으로 콘텐츠를 저장하고 분류하세요. 사용자 생성 Firebase 프로젝트에서 신규 사용자를 생성할 때는 createU
firebase.google.com
3. Layout에서 AuthGuard 적용
import AuthGuard from '@/app/_components/AuthGuard'
import { ReactNode } from 'react'

export default function MainLayout({ children }: { children: ReactNode }) {
  return (
    <AuthGuard>
      <div>{children}</div>
    </AuthGuard>
  )
}

'✨FRONTEND > 📍Next.js' 카테고리의 다른 글
| Chart.js 라이브러리로 달성률 시각화 구현하기(feat. Doughnut 차트) (0) | 2024.12.20 |
|---|---|
| 리액트 캘린더와 Firebase로 CRD 구현하기 (2) | 2024.12.16 |
| Next.js에 firebase 연동해서 회원가입 구현하기 (0) | 2024.11.29 |
| Zod + React Hook Form = 회원가입 뚝-딱! (0) | 2024.11.27 |
| 구글 간편 로그인 구현하기 (0) | 2024.09.07 |


